Thursday, October 27, 2016

Windows and More


I have heard people say "I don't do windows!"
Now, I know why.

Windows take lots of time to clean and repair.  Such is the case with the windows on "SeeMore."

Earlier in the project I removed all of the windows and had new glass cut for them.  
Both the sashes and the back frames needed to be cleaned and new seals needed to be ordered and installed.
Once everything was cleaned and the new glass was installed I set the windows aside to work on other projects.  
Now, I was ready to put seals onto the back frames and reassemble the windows into the trailer.
The back frames required a special bulb type seal and was ordered from Vintage Trailer Supply
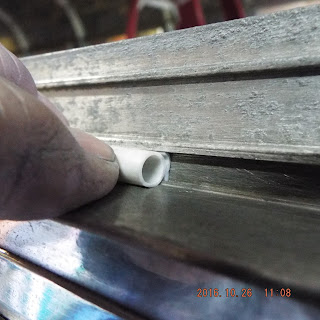
The seal has a specific profile to fit into the small channel on the back frame.


Here is a look at the profile of the seal.


Proper orientation to the window requires careful attention.


Tools necessary to install the seal are patience, scissors and a flat blade screw driver.


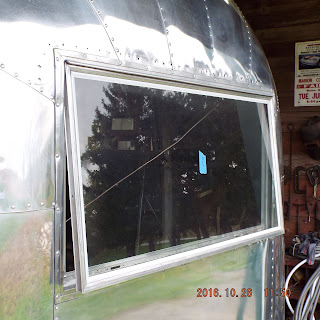
Once the new seals were installed the windows and hardware could be reassembled.


It was nice to have windows on the trailer again.

Refrigerator vent door-


The vent door needed to be repaired and a new seal installed.
All was polished before reassembly.


The seal was ordered from Vintage Trailer Supply.
It was required to be buck riveted onto the trailer body.


The seal had to be sandwiched between the body and the vent.


The seal and vent was all held into place with clecos and then buck riveted together.


With the bottom intake vent installed and the new roof vent in place the system should be ready for an operable refrigerator someday.


Roof vent with cover in place.

Thursday, October 20, 2016

The Eyebrow


The "eyebrow" is a curved awning piece over the door on Airstream trailers.  
It is a curved compound shape.

It has been said that when one looks at the shape of an Airstream” the eye is first drawn to the "eyebrow" over the door.”  Frank Yensan of  Frank’s Trailer Works Blog shared his experience,  knowledge and craftsmanship to rebuild his Airstream eyebrow.  Studying his work bolstered my confidence to replace the eyebrow on “SeeMore.”  The task was laborious and required patience.  It also took about eight hours to complete.


On close inspection "SeeMore's" eyebrow was bent, creased and split.


Here is another example of an eyebrow on a 1962 Airstream trailer.


And another example on a 1952 Airstream trailer.

Looking at these examples closely helped me to decide to build the replacement for "SeeMore."
It would also be built a little more stout and slightly wider.

Eyebrows look good and are functional in that they help keep water from rolling off the roof into an open doorway.


I removed the old eyebrow by drilling out the rivets.


The previous owner installed large "pop" rivets to hold the piece in place.
The center mandrels was missing leaving holes in center of each rivet alowing water to enter the coach.


Once the piece was removed the area needed to be cleaned. 


Once clean another problem was able to be addressed.
Several buck rivets holding the door frame together were missing.
They will need to be replaced.


Once free the eyebrow could be flattened out and used for a pattern.


To facilitate the shape needed I found a steel band from a buggy wheel.
It is strong for shaping the aluminum and is of about the right circumference.


I clamped, shimmed and tapped the metal into the desired shape.
Two bends were required on the compound curved shaped piece.
The shape also had to fit the curve of the trailer roof line. 


The first bend was straight forward and was made using the buggy wheel for a form.
This bend would be the one facing outward and is about 1./2 inch wide.


The second bend was much more difficult.  It faces the trailer and needed lots of manipulation.


I was not so successful at first.  
I toiled and made three before claiming "success!"


When completed a test fit was necessary.  
I used sheet metal screws to fit and attach the eyebrow to the trailer.


The fit was good. 
I re-drilled the holes to a bigger size and permanently attached the "eyebrow" using buck rivets.


Now the door frame and eyebrow were solidly in place.


At the end of the day I was very happy!

Saturday, October 15, 2016

Panel Replacement Curbside


The curb side panel behind the entry door had some issues that made it a prime candidate to be replaced.  
First, it had a refrigerator vent that had become obsolete with the installation of a more modern  roof vent. Second, it had a hole burned through it from a malfunctioning exhaust outlet from the old refrigerator.  Thirdly, a crude hole was cut for an electrical outlet/light hook-up that needed to be relocated for better functionality.  
And finally, I now have experience replacing full sized panels. 

I will enjoy trying my luck at this one.


Here is a closeup of the issues discussed above.


The trailer door had to be removed for this operation because the top hinge was attached to the panel.


Systematically, I drilled out the old rivets to free the 57 year old panel.


Before long the panel was out and I wondered what predicament I had gotten myself into.
This looks like a real "big mess!"
Never Fear!  


In the shop I carefully laid out the old panel on top of a new piece of  aluminum and cut to size.


I drilled some pilot holes and placed screws through both pieces to hold them in place.


With the two pieces held securely in place I marked the cut lines.


 The holes necessary to reinstall the panel were drilled using a 1/8 inch drill bit. The holes in the old panel acted as precise pilot holes. 


After drilling the holes a larger drill bit was used to clean out any burs left behind.


A test fit was necessary to see if it was correct.


After the test fit I finished polishing the side of the trailer in this area to make it look right.


With the help of my assistant the panel was riveted into place using buck rivets.
A strategic backer plate was added for strength where the door hinge attaches to the panel.  It was badly needed in my opinion.


I was very pleased at how well it turned out!

Corner Patch


An old fashioned TV antenna used to hang on the trailer near the curbside front panel.


When it was removed it left behind a few unsightly holes that need to be patched.


I made some measurements and came up with a plan.


Some strategic rivets were removed.


I cut a patch to cover the area and slid it into place.


I used caulking and buck rivets to seal it into place.

Looks pretty good and will shine up very nicely..